Aditya Birla Sun Life Insurance Company Limited
A Step-by-Step Guide to Filing your Taxes
Plan Smarter, Live Better!

Thank you for your details. We will reach out to you shortly.

Currently we are facing some issue. Please try after sometime.


- Table of Contents
June is here, and each year, around this time, you may have perhaps heard the phrase 'tax filing' doing the rounds among your colleagues and friends. Filing your taxes is something like an annual ritual.
Step-By-Step Guide to filing your taxes - ABSLI And if you're a salaried employee, chances are, your company's finance department may have been filing your tax returns for you each year.
But it's always good to know the details yourself, right? That's just what we're going to be doing today. Let's get started with the basics.
What is the meaning of 'filing your taxes'?
'Filing your taxes' is a phrase that is commonly used to describe the process of filing your income tax return with the tax authorities. Your tax return is nothing but a statement that contains the following details:
- Your earnings from the different sources of income
- Your tax3 liability based on your earnings
- The taxes paid and the refund due, if any
When should you file your taxes?
Typically, as per the Income Tax Act, 1961, taxpayers should file their tax returns for the previous financial year by July 31.
So, for instance, the due date for filing your returns for FY 2022-23 will be July 31, 2023..
Occasionally, the government extends this deadline in order to give more time to taxpayers for filing their returns. This year too, the deadline has been extended to September 30, 2021.
A step-by-step guide to filing your taxes
Filing your tax3 returns for the first time can seem intimidating. But it's fairly simple once you get to know the details. To make this easier for you, here's a handy guide that will take you through the steps involved in filing your taxes.
The income tax e-Filing portal has recently been revamped. So, these steps will guide you through how you can navigate the new layout and file your returns quickly.
Step 1: Log into the income tax e-Filing portal This is fairly straightforward. Here's what you need to do.
- Visit the income tax e-Filing portal at https://www.incometaxindiaefiling.gov.in/.
- If you know your login credentials, you can use them to log into the portal. There's also a handy 'forgot password' option to help you reset your password if you need to.
- In case you do not have an account yet, you can sign up on the portal before proceeding to file your returns.
Step 2: Select the option to e-File your return Once you've logged in, here's the path you need to follow.
- Hover over the 'e-File' option from the ribbon at the top of the page.
- Then, hover over the 'Income Tax Returns' button in the drop-down.
- Select the option called 'File Income Tax Return.3
Step 3: Fill in the required details You'll then see a screen like this, which requires the following details.
- Assessment year
- Filing type
- Audit u/s 44AB
- ITR type
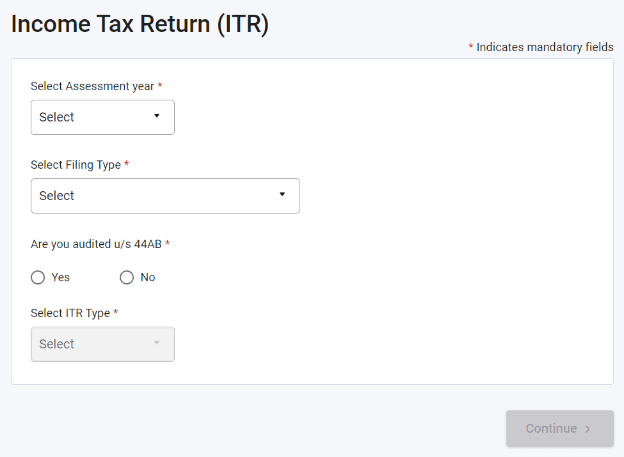
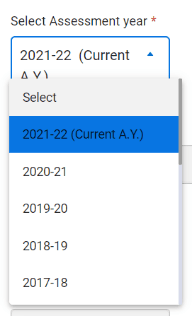
The assessment year is simply the year following the financial year. It is called this way because it is the year in which your income is 'assessed.' For example, if you're filing taxes for FY 2022-2023, the relevant assessment year will be 2023-2024.
The drop-down will already have this as the top option. Click on the current A.Y. as shown below.
You don't have to worry about the other details, because they're not really relevant if you are filing your taxes for the current year.
Step 4: Select the mode of filing Your tax returns can be filed online or offline. The web page will prompt you to choose between these options. Here's a preview.
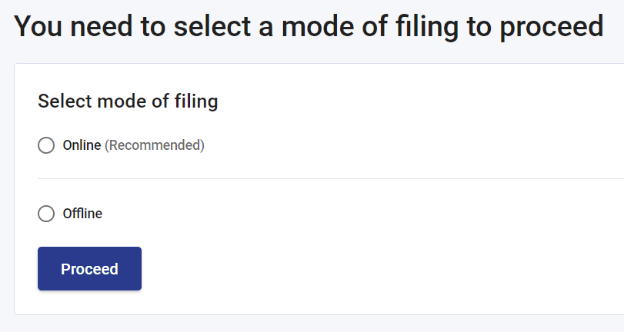
Since we're looking at the online mode of filing taxes, let's take that as the option and proceed with the e-Filing process.
Step 5: Choose between filing a new return or continuing your draft The great thing about filing your returns online is that you don't need to do it in one go. You can fill in whatever details you have, and come back to complete it later. In case you've already started filling your IT return, it will be saved as a draft on the portal.
If you're going to start filing it for the first time, you will have to choose the relevant option. Click the 'Start New Filing' option in the page, as shown below.

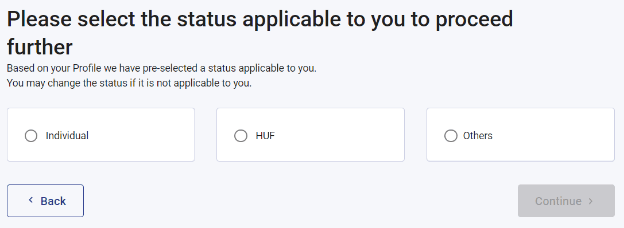
Step 6: Select the status applicable You will then have to choose the status applicable from the following options.
- Individual
- HUF
- Others
Here's a preview of the page you'll see at this point.
Step 7: Select the appropriate ITR form There are different Income Tax Return (ITR) forms for different taxpayers, based on the kind of income they have and their status. As an individual, you'll have to choose between ITR-1 and ITR-4, as shown below.
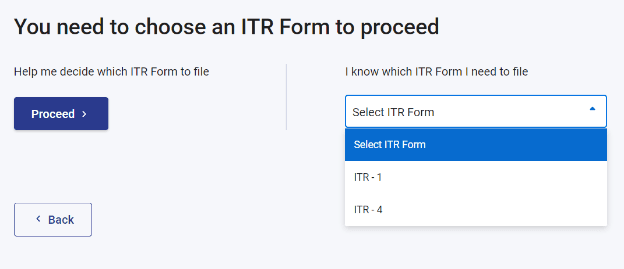
So, which one should you select? Here's some information that can help you make the right choice.
Choose ITR-1 if:
- You are a resident
- You have a total income upto Rs. 50 lakh
- Your income includes salaries, income from one house property, income from other sources (like interest etc.), and agricultural income upto Rs. 5,000.
Choose ITR-4 if:
- You are filing taxes for resident individuals, HUFs or firms (other than LLPs)
- The total income is upto Rs. 50 lakh
- The income includes income from business and profession computed under sections 44AD, 44ADA or 44AE of the Income Tax Act, 1961
To put it simply, choose ITR-1 if you are a salaried employee and ITR-4 if you are a self-employed individual.
Step 8: Select the reason for filing your ITR The portal will then ask you to choose the reason for filing the income tax return. Here's a closer look at the reasons available. You just need to choose the relevant option and proceed.
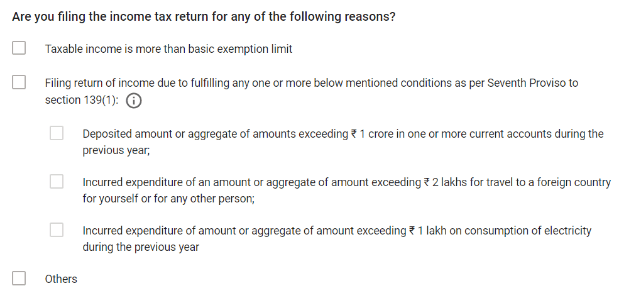
Step 9: Validate your return Once you select the reason for filing the ITR, the portal will show you a pop-up that looks like this.
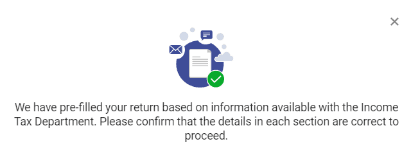
As you can see, a lot of your information may already be pre-filled. In addition to this, you may have to fill in whatever information is missing, or make corrections to any other details as needed.
This is to validate your return, which is the first of a three-part journey that looks like this:
-
Validate your return
-
Confirm your return summary
-
Verify and submit your return

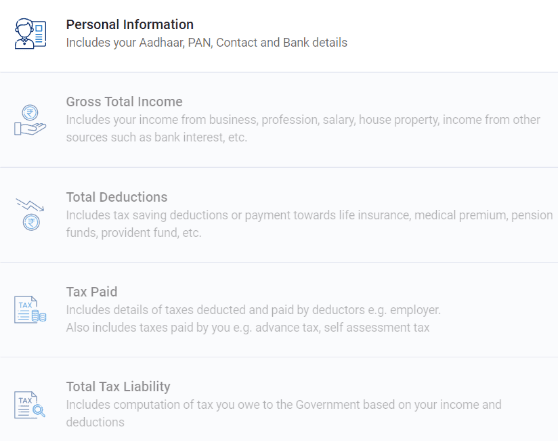
To validate your return, you have to check the details in the following five sections:
-
Personal information
-
Gross total income
-
Total deductions
-
Tax paid
-
Total tax liability
Wondering what these sections include? Take a look at the page, which contains all the details you're looking for.
Step 10: Confirm your return summary Your return summary will have all the consolidated details of your income and your taxes. Check this before you file your return and confirm the summary.
Step 11: Verify and submit your return Then, all you need to do is verify your ITR and submit it online.
Simple, isn't it? The important thing to remember is to ensure that all the details are correct and valid. For instance, if you are to receive a refund during this assessment year, make sure you give the right bank details. Similarly, if you have already paid TDS, make sure these details are entered, so your tax liability is accurately calculated.
WHAT IS AN INCOME TAX RETURN?
Before you learn to file your taxes, it's important to clear up some jargon, right? And one thing that most people often misunderstand is an 'income tax return'. It's often confused with an income tax refund. We have a blog that explains what an income tax return is.
PROTECT YOUR DREAMS AND SECURE YOUR FUTURE - AND WHILE YOU'RE AT IT, ENJOY TAX-SAVING DEDUCTIONS TOO!
Notice the section for 'total deductions' in your tax return?
That's where you can make use of your life insurance premiums to reduce your tax liability. Some life insurance plans give you benefits under multiple sections too - like the ABSLI SecurePlus Plan, which gives you tax benefits3 under sections 80C and 80D.
Plus, it comes with an inbuilt accidental death benefit as well!
Thank you for your details. We will reach out to you shortly.
Thanks for reaching out. Currently we are facing some issue.
Buy ₹1 Crore Term Insurance at Just ₹575/month1
ABSLI DigiShield Plan
Life cover up to 100 years of age.
Joint Cover Option
Inbuilt Terminal Illness Benefit
Tax Benefit^
Return of Premium Option~
Life Cover
₹1 crore
Premium:
₹575/month1
Most Popular Calculator
Guaranteed returns after a month¹
ADV/6/23-24/667
